How To Replace A Broken Screen for iPhone 7 Plus?
iPhone 7 Plus Screen Replacement
General repair instructions
-
Always use good lighting - smart device components are small and you'll need plenty of light to see what you're doing.
-
Maintain a clean, organized workspace so that you don't lose or confuse any components.
-
Group your screws so you can keep track of their positions. Most screws cannot be interchanged.
- Apply enough heat to loosen the adhesive but not to damage the device.
- At any point during repair, if the adhesive becomes difficult to separate, apply more heat.
After separating adhesive, keep the case and screen close together until the flex cable is disconnected.
The iPhone 7 Plus LCD screen assembly is difficult to remove and replace: Some flex cables can tear easily, so proceed with care. In addition, loosening the screen's adhesive requires controlled heating with a dehydrator or a heat gun.
Tools and parts required: Not only will you need a new LCD, if you want to be technically on the part - you'll need some phone repair tools if you're going to do this it's correct.
- iPhone 7 Plus LCD assembly
- Metal spudger
- Phillips head srewdriver
- Three-point screwdrivers
- Dehydrator, Heat Gun, or heat mat
While it's not mandatory to repair your iPhone, we also recommend using a magnetic pad and screw capsules to keep everything organized. You will be working with some small screws here; These will help you keep them on your desk and not get lost on the floor.
Turn off your iPhone and heat it up.
Start by heating the internal adhesive strips with a dehydrator, heat gun, or insulation plate. The heat gun is the fastest, but be careful because it is easy to overdo it and damage the device. Twenty minutes in the dehydrator should be enough. Ten to twenty seconds of a heat gun on a low setting should be all you need to loosen the adhesive.
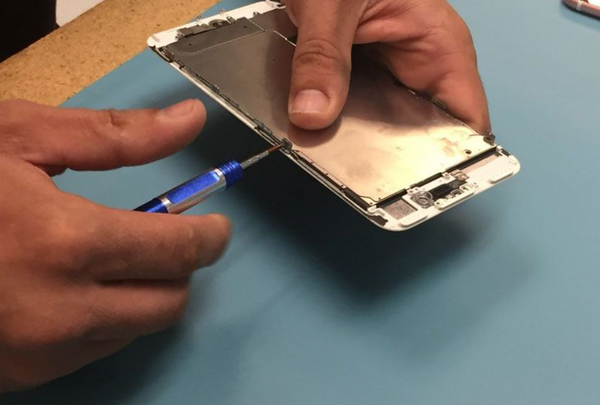
Step 1: Open iPhone
- Remove the two pentalobe screws on the bottom edge of the phone. They are on either side of the lightning gate.

- Using the metal spudger, slowly and carefully separate the iPhone's screen from the body, start slowly from the bottom edge of the Lightning port, do not push the metal spudger too far into the device.

- The left side of the screen opens up the body like a unfolding book. The flex cable connecting the monitor to the battery is still attached, so be careful.

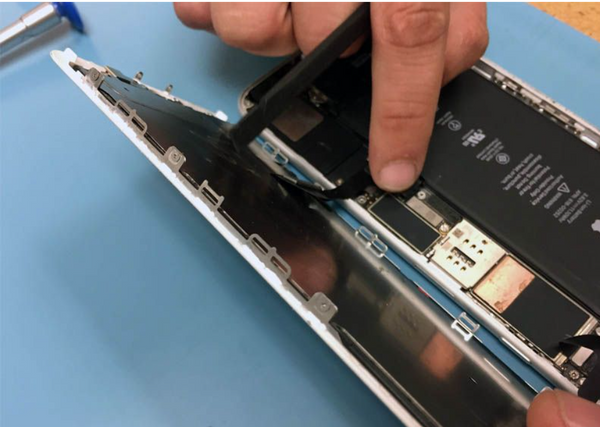
Step 2: Disconnect the cable
- Remove the silver EMI shield on the right side of the phone. It is secured with four three-point screws; one of those screws is longer than the others.

- After the shield is off, use a spudger to disconnect the battery from the logic board. It must be disconnected before go ahead any steps, in case some of phone parts will be damaged.

- Remove the two Philips head screws on the shield on the front panel sensor connector; It's the silver shield near the top of the phone with the flex cable appearing from below.

- Disconnect the black front panel sensor connector cable from the logic board to the spreader: It connects the screen to the body of the iPhone.

- Remove the LCD assembly of iPhone 7 Plus from the body.

Step 3: Remove the front camera and headset
Next, we'll remove the five Phillips head screws that hold the silver bracket at the top of the LCD assembly

- Pull the front camera up and out of the way with your spudger or tweezers.
- Now you can remove the headset speaker.

-Use your spudger to remove the ambient light sensor and proximity sensor. This is a thin cable that can easily tear, so be careful.

Step 4: Remove Home / Touch ID button
- The Touch ID sensor must be carefully removed.If not removing it securely or breaking any of its connectors, it will require access to the Apple Store.
- Remove the pentalobe screw that holds the Touch ID and the home button frame.
- Remove all screws around the edges of the LCD shield. There are 5 tri-point screws and 1 Philips head screw on the bottom edge.

- Pull the LCD shield away from the screen. The flex cable goes through the gap on one side.
- Using your spudger, disconnect the home button cable connector.

- Disconnect basic connections carefully.
- Raise the adhesive holding the Touch ID and Home buttons on the back of the digitizer.
- Press the home button forward through the front of the screen.

Step 5: LCD Replacement
- Insert home button into new screen from front.
- Reconnect the home button flex cable
- Pass the flex cable through the LCD shield. Put the LCD shield in position on the screen.
- Tighten 5 three-point screws and a single Philips head screw fasten the LCD shield to the screen.
- Reattach the home button holder. There are four three-bladed screws. Don't overload as this can cause Home button issues. The shorter screws go directly on the home button.
- Using your plastic splint, gently press the ambient light and proximity sensor back into place.

- Reinstall the front camera.
- Reinstall headset speaker.

- Attach the bracket on the front camera. It needs first year Phillips.
Step 6: Put the components back together
- Reconnect the front-facing camera flexible to the logic board.

- Screw into the front of the camera EMI shield using two Philips head screws.
- Reconnect the display flex cable.
- Fasten the EMI shield flex display back to the right middle side of the phone using four three-point screws. The longer screw is in the right corner.

- Fold the screen on the body. Insert the top of the screen in the frame first. Proceed with care, it will click back into place but don't press too hard on the glass.

-Tighten the two pentalobe screws on either side of the lightning port.
